4. Rendering System
render.RmdThis article goes over the motivation behind the parts of the rendering system. It builds up from simple console printing to rendering animations ingame.
Example usage of the rendering functions can be found in their
documentation, e.g. ?render.scene.
1. Goals
Game with graphics need a way to display their graphics. rcade is intended to run live-input games at relatively high fps (frames per second), so it needs a graphical system capable of redrawing itself at the desired framerate. Past achieving that, it’s a matter of getting as high a resolution as feasible.
2. Console Graphics
R plotting is far too slow to fulfill our needs. Instead, we turn to a canonical apporach— rendering via the console. Pixels can be printed as characters in the appropriate locations, giving a low-resolution but highly usable medium for rendering images. In fact, RStudio allows you to zoom out a considerable amount, allowing the console to fit upwards of 800x600 characters.
A couple issues come up. First, characters are much taller than they
are wide, so we use pairs of characters—usually brackets:
[]—to create square pixels.
2.1 Pixel Art in the Console
Printing to the console like this is quite simple. Strings like this are quickly interpreted by users as imagery:
Example [click to expand]
cat('
  []  []
  []  []

[]      []
  [][][]
')
But we run into an issue. Art can be printed to the console, but there’s no guarantee it shows up in the right position vertically…
Luckily, clearing the console means that the next message will always
show up in the same place— we can just clear the console every time we
draw. RStudio supports this with the escape character
cat('\f')1, though R.app unfortunately doesn’t.
2.2 Storing Pixel Art
If we want to print lots of images, we can’t just store everything as
strings— it would be a nightmare to work with because of how clunky
strings are to edit. Instead, we can write a function,
render.matrix(), to convert directly from a bitmap matrix
to a drawable string:
render.matrix
render.matrix = function(M, palette = c('  ', '[]', '  ')){
  #we assume the bitmap to be positive integers

  #attach a line of -1 values on the rightmost column to turn into newlines
  M = rbind(t(M),-1) #transpose to match the orientation of print(M)

  #add two to make all values work as vector indices
  M = M + 2

  #convert matrix to vector of strings using its values as indices
  str = c('\n',palette)[M]

    cat(str, sep='') #collapse vector and print
}

render.matrix(matrix(c(0,0,1,0,0,0,0,1,1,1,0,1,0,0,0,1,1,1,0,1,0,0,0,1,0,0,1,0), ncol = 7))
#>     []  []
#>     []  []
#> []          []
#>   [][][][][]
palette defines how we convert bitmap values to
character pixels— by default, 1 encodes filled (black)
pixels and 0 and 2 are white. Values of
0 are used elsewhere in the rendering system to represent
transparency, but assume a white background here and draw them as
white.
3. Sprites
So render.matrix() lets us print pixel art to the
console if we have a matrix that encodes it. This package calls such a
matrix a sprite.
Example
#A sprite is anything that can be printed by render.matrix():
sprite = matrix(c(0,0,1,0,0,0,0,1,1,1,0,1,0,0,0,1,1,1,0,1,0,0,0,1,0,0,1,0), ncol = 7)

print(sprite)
#>      [,1] [,2] [,3] [,4] [,5] [,6] [,7]
#> [1,]    0    0    1    0    1    0    0
#> [2,]    0    0    1    0    1    0    0
#> [3,]    1    0    0    0    0    0    1
#> [4,]    0    1    1    1    1    1    0

render.matrix(sprite)
#>     []  []
#>     []  []
#> []          []
#>   [][][][][]
Typically, the game stores and handles sprites directly (as
matrices), and the game dev is expected to generate them on their own.
The package provides a convenient tool for this:
render.makesprite().
3.1 Sprite Creation
render.makesprite() converts user text to a sprite as
intuitively as possible. The goal of this function is to remove the need
for confusing matrix manipulation, and to follow the principle of
WYSIWYG for maximal convenience: “what you see is what you get”.
Example
circle = render.makesprite('
  OOO
 O   O
O     O
O     O
O     O
 O   O
  OOO
')

render.matrix(circle)
#>     [][][]
#>   []      []
#> []          []
#> []          []
#> []          []
#>   []      []
#>     [][][]
The limitation is that character strings will look a bit different from square pixels, but overall I’ve found the function to be extremely useful.
Sometimes, it’s easier to create a sprite manually as a matrix. This is especially useful for geometric or procedural shapes:
Example
box = matrix(1,8,16)
box[2:(nrow(box) - 1), 2:(ncol(box) - 1)] = 0

render.matrix(box)
#> [][][][][][][][][][][][][][][][]
#> []                            []
#> []                            []
#> []                            []
#> []                            []
#> []                            []
#> []                            []
#> [][][][][][][][][][][][][][][][]
4. Drawing Multiple Things at Once
render.matrix() lets us render an individual sprite to
the console. The natural next step is to somehow
combine sprites so they can be drawn together in one
image.
The general approach to this is to take a big, empty, rectangular ‘background’ sprite, and edit in our sprites:
Example
sprite = render.makesprite('
 O O
 O O

O   O
 OOO
')

background = matrix(0,12,10)

#paste in sprites
background[1:5,1:5] = sprite
background[2 + 1:5, 5 + 1:5] = sprite
background[7 + 1:5, 3 + 1:5] = sprite

render.matrix(background)
#>   []  []
#>   []  []
#>             []  []
#> []      []  []  []
#>   [][][]
#>           []      []
#>             [][][]
#>         []  []
#>         []  []
#>
#>       []      []
#>         [][][]
The problem with this is that replacing values directly with
matrix[a:b,c:d] will always overwrite the original values.
We can get around this with code like this to allow for sprites with
transparency— we just encode transparent pixels as a value of
0.
overwrite = sprite
overwrite[sprite == 0] = matrix[a:b,c:d][sprite == 0]
#replace values of 0 with the value underneath
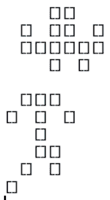
matrix[a:b,c:d] = overwriteExample
background = matrix(0,9,9)
background[1:7,1:7] = circle
overwrite = circle
overwrite[circle == 0] = background[1 + 1:7,2 + 1:7][circle == 0]
background[1 + 1:7,2 + 1:7] = overwrite
render.matrix(background)
#> [][][]
#> [] [][][]
#> [] [] [][]
#> [] [] [] []
#> [] [] [] []
#> [][] [] []
#> [][][] []
#> [][][]
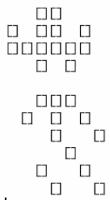
#> This whole process is automated by render.overlay(),
which also clips the sprite to ensure that everything is kept within the
bounds of the matrix.
Example
background = matrix(0,9,14)
background = render.overlay(background, circle, 1, 1)
background = render.overlay(background, circle, 3, 3)
background = render.overlay(background, circle, 11, 1)
render.matrix(background)
#> [][][] [][]
#> [] [] []
#> [] [][][] []
#> [] [] [][] []
#> [] [] [] [] []
#> [][] [] [] []
#> [][][] [] [][]
#> [] []
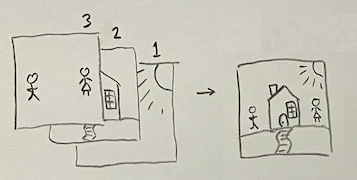
#> [][][]5. Layers and the Scene
Now that we can combine sprites, we run into the issue of convenient ordering. Which sprites should be drawn on top, and how do we achieve that?
rcade addresses this with render.scene(). We create a
‘scene’ object containing layers, each of which is
their own background from the previous section. The engine
draws sprites onto specific layers, and then finally takes all the
layers and overlays them one-by-one to produce the final matrix to be
drawn.
render.scene() stacks individuals
layers in a scene into a single sprite matrix to be drawn by
render.matrix().To draw a sprite onto a layer, we use render.sprite(),
which is really just a wrapper for
render.overlay(layer,sprite).
5.1 The Inversion Layer
In monochrome displays, you’ll sometimes run into the issue where something important, like text, is drawn over a black background and becomes impossible to see. A simple fix is to, rather than drawing the text as set color, just allow it to invert the color it’s drawn on— that way it’ll always be visible2.
rcade implements this with a dedicated scene layer
called scene$layers$invert, which is drawn last and inverts
anything it covers. This uses the invert argument of
render.overlay().
Example
scene = list(width=48, height=12)
block = upper.tri(matrix(1,12,32))[12:1,]

scene = render.sprite(scene,block,12,1)

txt = render.text('inversion\nof colors')

scene = render.sprite(scene,txt,2,1,layer='invert')

render.scene(scene)
6. Drawing the RAM
The game rendering process involves drawing every game object onto
one scene. This is automated by render.ram(), which is
called every frame— see vignette("timing").
In this function, a scene object is created, and then
each game object (in RAM$objects) is drawn to it with
render.sprite().
6.1 Sprites in ROM
By convention, sprites/images are stored in ROM when possible.3 They are
stored by name in ROM$sprites, and referenced during the
rendering process.
6.2 Object Drawing Specifics
Object drawing is handled by render.object(), which
figures out how and where to draw the object with
render.sprite().
Objects are only drawn if they have a $spritename, which
indicates which sprite they use. This is a character string
corresponding to a sprite matrix in ROM$sprites— then
render.object() retrieves the sprite from
ROM$sprites and feeds it into
render.sprite().
Objects have quite a few optional properties, listed in
?render.object. These control things like position and
whether or not this particular object should swap around the colors in
its sprite. ‘palette swapping’ of the colors like this is an easy way to
increase the variety of images in a game without needing to make new
sprites.
Example
sprite = render.makesprite('

 ...
.O=O.
.....
 ===

',lookup = c(' ' = 0, '.' = 1, '=' = 2, 'O' = 3))

render.matrix(sprite, palette=c('  ','..','==','()'))
#>
#>   ......
#> ..()==()..
#> ..........
#>   ======
#>
render.matrix(sprite, palette=c('  ','..','++','\\/'))
#>
#>   ......
#> ..\/++\/..
#> ..........
#>   ++++++
#>
render.matrix(sprite, palette=c('  ','||','MM','()'))
#>
#>   ||||||
#> ||()MM()||
#> ||||||||||
#>   MMMMMM
#>
6.3 Custom Drawing Code
It is often useful to override this basic drawing behavior— for
example, if an object’s sprite should be generated procedurally rather
than copying from a static sprite in ROM$sprites. This can
be done by defining obj$draw(), which will run instead of
the regular code in render.object().
Note that obj$draw() should return the
scene, and thus must not include any code that changes
values in the object itself; those changes should occur in game code in
ROM$custom() (see vignette("engine")).
7. Animations
Now to the topic of animations. All we have to do is make a game object change its sprite every few frames:
This is facilitated by calling render.animate() when we
retrieve an object’s sprite in render.object(). For sprites
we want to animate, instead of storing just the pixel art matrix, we
store a list containing each frame of animation and some other
information about the animation. render.animate() then
parses these to figure out what frame of animation it should return.
Example: TODO. See render.animate() in
the meantime.
We can also specify whether an animation should loop or transition to
a different sprite after completing, by giving the list a value for
next_animation.
So for the game dev, all that’s needed to animate a sprite is to
store it as a complex sprite in ROM$sprites and add some
metadata about the animation. Very convenient! Sprite animations can
also be tested with render.test_animation to ensure they
look as they should.
8. Text
Now for the topic of rendering a piece of text ingame. We could just
render.sprite() each character individually, but this is
needlessly ineffecient; instead, the best solution is to combine all the
characters into one sprite and render that in a single
render.sprite() call. This is the purpose of
render.text().
8.1 Fonts
But first, how should store the sprites for each character? rcade
handles these pretty simply— it has font objects which contain
some information about the size/spacing of the characters, and also
contain a list of sprites for each character.
?render.makefont provides more detail on this, and
inspecting View(fonts.3x3) may be useful as well.
8.2 render.text()
The basic functionality of render.text() is stitching
together character sprites with the desired (or default) spacing. It
outputs a sprite, to put in ROM$sprites or draw on the fly
in obj$draw(). Putting text on the inversion layer (with
render.sprite(...layer = 'invert') may be helpful to ensure
that the text is readable on both black or white backgrounds.
Additionally, some code is included to provide the option to wrap words to fit in a given width of pixels, and align them to the left/right/center.4
Here’s an example of render.text()’s stitching:
Example
#manually stitching letters with a 1-wide gap between
render.matrix(
  cbind(
    fonts.3x3$sprites$T,
    matrix(0,3,1),
    fonts.3x3$sprites$E,
    matrix(0,3,1),
    fonts.3x3$sprites$X,
    matrix(0,3,1),
    fonts.3x3$sprites$T
  )
)
#> [][][]  [][][]  []  []  [][][]
#>   []    [][]      []      []
#>   []    [][][]  []  []    []

#render.text() does this automatically
render.matrix(
  render.text('text', kerning = 1)
)
#>
#> [][][]  [][][]  []  []  [][][]
#>   []    [][]      []      []
#>   []    [][][]  []  []    []
#>
?render.text provides some more examples of its
capabilities.
9. Rendering Pipeline
Let’s go through the process to get an ingame object drawn on the console.
9.1 Setup
We start with an object called Blueberry. It’s at the xy coordinates (5,6) and is on layer 5 of the game scene.
Blueberry is stored in RAM as the list
RAM$objects$blueberry, and has the following elements:
$x: 5
$y: 6
$spritename: 'blueberry'
$layer: 5- We also have a corresponding sprite stored as
RAM$ROM$sprites$blueberryas a simple matrix.
9.2 Pipeline
We’re going to draw the current frame of RAM. This starts with calling
render.ram(), which initializes asceneonto which all the sprites will be drawn.render.ram()iterates through every object inRAM$objectsand callsrender.obj()on it to draw it on thescene.So
render.obj()is called onRAM$objects$blueberry. This reads Blueberry’s elements and feeds them intorender.sprite():render.sprite()retrieves Blueberry’s sprite fromRAM$ROM$spritesand draws it (usingrender.overlay()) on layer 5 of thesceneat coordinates (5,6).After
render.obj()is called for all objects,render.scene()is called, which stacks the layers of thesceneonto one matrix usingrender.overlay().This single matrix is fed into
render.matrix(), which clears the console and then renders the matrix.
10. Flickering
The timing system (vignette("timing")) is robust enough
that slow draw times (i.e. for large resolutions) won’t impact the
fluidity of gameplay. However, the basic drawing system has a big flaw:
flickering.
base::cat() prints output in large chunks of characters,
and each chunk takes a tiny bit of time to print. (Try
cat(rep(1,100000)): it takes a good second for the whole
output to finish printing). This creates a problem: when we clear the
console with '\f', the first chunk of characters are
immediately printed to fill the blank space, but it takes a split second
for the rest of the characters to get drawn. The background is blank
during that split second, so we end up with a brief flicker of white on
every frame that gets stronger the more characters (including
whitespaces!) are drawn.
Thankfully, there’s a workaround! We can abuse text wrapping to
render things all on “one line” whi, and then use '\r' to
overwrite it each frame. All we need to do is replace '\n'
with a long series of tab characters—'\t'—which have the
property of essentially doing the same thing visually as
'\n' when they cause the text to wrap.
This has several benefits: in addition to removing flickering, this
lets us animate the game without having to clear the console with
'\f'— which means it can even run in R.app!
I discovered this workaround very late into working on rcade: I plan on making it the package’s default, but haven’t gotten around to it yet.